Saturday, October 30, 2010

Tony's Food 101: Pot Roast for a Hard Rotation (or Busy Work Week)

It's no secret that I haven't been particularly good about posting lately, and it's primarily because of a rough month on the Stroke team in September and a deadlines for AAN 2011 abstract submissions in October (along with my annual pilgrimage/vacation to Burlington, VT and a houswarming party to throw). So what's a busy resident to do, balancing service requirements, studying, social life and a stalwart dedication to cooking at home as much as possible? Well, as the weather cools down, the answer is simple: the crock pot.

If you don't own one, go and buy or order one right now. I'm not even kidding. They don't cost more than $30 and they accomplish two amazing things:

1) They do all the actual cooking for you while you're at work - all you do is throw ingredients in and turn it on. It's also nearly impossible to burn anything in a crockpot, so no worries there.
2) They cook things at a very low temperature for a very long time - delicate flavors are preserved and overall the flavor of a dish has hours to develop.

This allows busy people to make amazing things to eat without dedicating more than 15 minutes in the kitchen. It also allows said busy people to cut down on all the salt and fat and preservatives they would otherwise be dragooned into eating from prepared foods. I tend to view crockpot-type foods as more seasonal for fall and winter (e.g. roasts, hearty stews), but there's no reason not to haul out this ceramic wonder May through August. Here's a super fast, amazing technique for pot roast that I developed in medical school and perfected for busy service months.

Crock-Pot Pot-Roast
  • A 3-5 pound beef round or chuck roast.
  • Two large onions, cut into 1/4 inch thick rounds or half-rounds.
  • Two cloves of garlic, smashed.
  • Whole seasonal fresh herbs (I like sage or rosemary in the colder months).
  • Coarse salt and cracked black pepper to taste.

Ok, this is really, really easy. Put the onions and garlic in the bottom of the crock pot in the morning before you leave for work (you can cut everything up the night before, if you're not up on your knife skills). Rub the roast with salt and pepper and plop it down on top of the onions. I find that if there's a fatty side, putting that up works best. Throw your herbs on top. Cover and turn on low. (In the past, I've tried turning it on high for an hour and then turning it down: This makes no difference). Go to work. Come home to find a tender, flavorful roast sitting in a ton of jus. You will have leftovers (it makes an awesome sandwich with horseradish sauce). I store it in a tupperware with the jus in it, this will keep it from drying out, and you can just microwave the whole thing to re-live your home-cook-rock-star dinner on another late night later that week.

I will try to post more often, I have some pretty good material lined up for November.

Wednesday, September 1, 2010

Why You Should Buy Eggs From Local Farms

Read this report from the inspectors from one of the farms involved in the recent egg recall and see if you are persuaded to switch to eggs laid by cage-free local chickens, regardless of price. Even before the recall, I had started buying eggs from the farm that we belong to for our CSA and this recall only helped me confirm the wisdom of my choice.

Thursday, August 26, 2010

Summer Semester '10: Ceviche

Ceviche is one of those foods that, in the same vein as sushi, a good number of people are deathly afraid of because it is not cooked with heat. Unfortunately, even in this day an age, well past the days of cholera and dysentery here in the US, infectious diseases and food bourne illnesses are a very real concern. While it is true that raw and undercooked foods present a higher risk for carrying food bourne illnesses than their well-done counterparts, I've always found it fascinating that people don't think to ask about where their food is coming from as an indicator of how likely it is to be contaminated. Admittedly, I've been on a big Omnivore's Dilemma kick (only fueled by my girlfriend getting me Animal Vegetable Miracle for my birthday this year). Just this past week, 380 million eggs were recalled from an Iowa concentrated animal feeding operation (CAFO) because of salmonella outbreaks. To bring this post back to blog relevance, this is why I bought the fish for this following recipe for ceviche from my local Whole Foods. Sure it was more expensive, but at least it came with some token knowledge of where regionally the fish was caught or farmed, and something about the farming practices of the specific place (no hormones, antibiotics, et cetera). Sure there were people who didn't want to eat it, just for what it was, but out of everyone who did at the large cookout I prepared it at, not a single person got ill.


I became hooked on ceviche years ago, and recently got one of my friends hooked too. In fact, we actually cleaned out our cruise ship's supply of it back during our last vacation in April. It was being offered as a free appetizer at the ship's wine bar, and his wife and my girlfriend didn't even get to try any after we were through! Although there are many, many variations (some local and some more progressive-chef-creative), it really couldn't be a simpler formula:


Fresh Fish + Citrus Acid + Salt + Time = Ceviche


Of course, there are some other wonderful additions like chiles, garlic, herbs, tomatoes and garnishes, but I will leave those at your discretion. As it is served cold, I prefer it as a summer dish.


Simple Ceviche


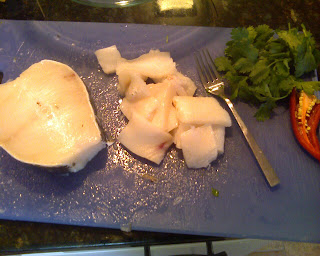
  • About one pound of fresh, high quality, preferably organic, preferably local (to increase freshness) seafood (Figure 387.a). Previously frozen isn't ideal, but it is acceptable. I've used sea bass, scallops, snapper, shrimp ... really any solid, meaty seafood or shell fish. Avoid flakier and more delicate stuff like tilapia. You want something that will hold it's shape after 3-4 hours of marinating in a relatively strong acid.

    Figure 387. a - Big Fish.

  • One to one and half cups of freshly squeezed citrus acid. Lime is classic, but I've recently used a combination of lime and grapefruit to good effect. Strain it to make sure mostly all of the pulp is removed (figure 387.b)

Figure 387.b - A combination of lime and grapefruit juice. I wish I had tested the pH for nerdiness' sake.
  • A teaspoon of salt. Feel free to omit this right away and sprinkle it on later. You can also use more interesting salts post-hoc in this way as both a flavoring and a garnish, like Himalayan pink salt, Maldon salt, black salt, et cetera.
  • One or two hot chili peppers to taste.
  • A big bunch of cilantro, de-stemmed and chopped.
  • A clove of finely chopped garlic.
  • Garnishes like match-stick cut mango and super thinly sliced spanish (red) onion or sweet onion.

Toss all the ingredients together in a non-reactive (read: not plastic, not metal - glass) bowl. Keep it cool and allow it to marinate for 3-4 hours. The acids in the marinade will actually denature the proteins in the fish as heat would, leaving you with super tasty fish with a cooked texture. Serve with whatever garnishes you like, and if bringing it outdoors, put the glass bowl inside another bowl with ice and water to keep it cool.

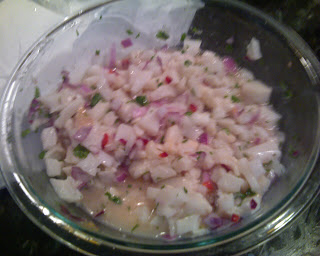
Figure 387.c. - Please note how unreactive the bowl is.


Figure 387.d - The finished product, ravaged by party-goers.

Sorry that I haven't been posting as regularly as I'd like to, my girlfriend and I took the big step and moved in together, and two apartments worth of unpacking (and my other birthday gift, Red Dead Redemption) have been keeping me pretty occupied. I'll figure out something to post next week.

Thursday, August 12, 2010

Summer Semester '10: Catch of the Day

Sorry for the lack of updates, I recently moved and my computer is busted. I'm stealing a little time away from work, believe it or not, to chip away at this update I've been meaning to post for a few weeks now.

So this is something I really enjoy: deep sea fishing. I went a couple of times back in medical school for various friends' bachelor parties, and then I just went again recently. We mostly fish for striped bass (a.k.a striper, rock fish) in the North Atlantic. Once, we went on an all day trip, but forgot to bring anything but beer. That was entertaining. My personal favorite part of the trip is bringing home filet upon filet of awesome fish. The last time we went, we also caught some blue fish, which I found infinitely more flavorful, but much smaller than the striper.

Being known to experiment with food and having a huge glut of striper filets to experiment with, here's something that I came up with that works really well. You can certainly buy the fish in a market rather than catching it yourself, but for some reason, it may not taste as good. Use panko bread crumbs - this will give the outside of crispy texture that regular bread crumbs won't give you.

Panko and Spice Encrusted Sea Bass
  • One or two whole filets of striped bass (0r blue fish), cut into portions.
  • As much flour as you need for dredging (probably about a cup per 2 lb of fish). I initially used all purpose flour, but I've recently found that whole wheat flour works better.
  • Pick your favorite spice or spice mix and get about 1-2 tsp of it. I've used cajun blend, smoked paprika and chinese five-spice so far. Mix it in well with the flour.
  • One egg per pound of filet, beaten.
  • One cup of panko bread crumbs per filet.
  • (optional) A small bunch of flat leaf italian parsley, stemmed and chopped fine, mixed in with the panko.

In three seperate bowls, prepare your flour and spice dredge, your beaten eggs and your panko, with our without herbs (Figure 17.x). Start some olive oil (or cooking spray) in a flat skillet on medium heat. Dredge your fish portions in flour, then egg, then panko in that order. Make sure every surface of the fish is coated at each step. Toss into the pan, and cook for about 5-10 minutes per side, depending on thickness. Flip only once, when the fish releases easily from the bottom of the pan (Figure 17.z). Enjoy!


Figure 17.x - Flour, then egg, then panko.

Figure 17.z - Fish in action!

Next update (hopefully next week once I get my computer fixed... Geek Squad here I come) will be another fish dish... a little more fresh and a little less wild. The fish, I mean. Not the dish.

Wednesday, July 14, 2010

Rhubarb Errata

I recently tried adding a dash of aromatic bitters to each of these drinks, and it really changes their flavor. I highly suggest it. I've been using good ol' Angostura bitters right along in cocktails, but I recently also picked up a bottle Fee Brother's Whiskey Barrel Aged Bitters, which are amazing. Both are great, although I would stay away from fruit-based bitters, as they really detract from the rhubarb's flavor.

Saturday, July 10, 2010

Summer Semester '10: The Last of the Rhubarb

I've never really interacted with rhubarb on any level prior to this year, now that my girlfriend and I have joined a local community supported agriculture farm (CSA). My grandfather never grew it in his garden (at least, during my 28 years eating from it), and my mom, never one to whip up pies, cakes, or other desserts without a good reason, never baked with it. I would walk by it in the grocery store every year and turn up my nose at what I thought was pretty much equivalent to ugly red celery.

One of the joys of participating in a CSA is that you never know what you're going to get in your share. For 3 weeks now, we've gotten big bundles of rhubarb (see figure 19.i). My girlfriend took some, promising to make jam or a cobbler or something. The problem is, she's away at her family's summer beach cottage while I'm stuck here working over night shifts every four nights or so while the new residents "acclimate" to the hospital (I swear, they get softer on the new neurology residents in my program every year). I was also stuck with this week's rhubarb, which is apparently the last of the season. A quick search on my go-to food resource CHOW.com showed me a neat little trick to do with the scarlet stalks - rhubarb syrup. And thus, as a welcome back surprise for my girlfriend, the Rhubarb Basil Martini was born. Then along came it's younger brother, the Rhubarb Gin Fizz.

Figure 19.i - A quick before-and-after shot.

Rhubarb Basil Martini
  • 1/2 oz. of rhubarb syrup - recipe linked above
  • 1 & 1/2 oz. of vodka
  • 1/2 oz. of dry white vermouth [note: we ran out of dry vermouth and tried using sweet red vermouth, and the drink came out disgusting. I do not suggest this substitution.]
  • 6-7 small basil leaves, and one large basil leaf for garnish.

Place the basil leaves in your cocktail shaker, then add ample amounts of ice. Pour the liquors and syrup over the ice and basil, cover and shake. Strain into a martini glass and garnish with one large basil leaf.

Rhubarb Gin Fizz

  • 3/4 to 1 oz. rhubarb syrup, depending on how sweet you want your drink.
  • 1 & 1/2 oz. of gin. I have a bias towards Henricks, which I think a) is one of the smoothest gins on the market, and b) just feels right in a quirky drink like this one.
  • Ice.
  • Club soda.

Pour the syrup and gin over the ice in a rocks glass, fill to the top with club soda and give it a gentle stir.

Enjoy! Next week, we'll look at my #1 favorite thing to do after a deep sea fishing trip with my buddies (other than sober up and maybe take a nap).

Wednesday, June 30, 2010

Summer Semester '10: Squash Flowers are in Season

Figure 46.u - Behold, the mighty squash flower!
Squash blossoms are what I consider the ultimate seasonal food. Unlike even the venerable pomegranate (formerly only available around Thanksgiving, now seen in grocery stores year-round) you can only get squash flowers over a few weeks at the end of spring and the beginning of summer.

I'm lucky enough to have a family friend who sends me a beach-ball sized bag every year.

These edible flowers have a taste that's unlike anything else like them. They are very un-floral in taste, and not perfume-y at all. They have a very delicate, vegetal flavor with just a slight sweetness. So, what do you do with them? Traditionally, they are dredged or battered and fried. I have seen them on restaurant menus stuffed with cheese. When I get sick of frying them, I've been known to top pizzas with them, and I'm thinking about baking them into a quickbread in lieu of regular zucchini. My mom recently made a frittata (read: thick italian omlette) out of them, and it was better than a regular zucchini frittata she made the same day.

If you happen to have your own squash plants, make sure you only pick the male flowers, which grow on long stems. The female ones will eventually develop into the actual squash itself. Don't pick too many at once, or there won't be enough male flowers around to pollinate all the female flowers in the first place.


Traditional Squash Flowers

  • As many male squash flowers as you can get your hands on, long stems removed. Leave the green leafy part at the bottom, though.
  • A glass pie plate full of all purpose flower
  • Another glass pie plate with 5-6 eggs, cracked and whipped up with a fork.
  • Vegetable oil for frying.
  • Salt to taste

Wash each flower thoroughly, making sure to rinse out inside the petals, as ants and other critters may have haplessly fallen in. Dredge each flower first in flour then in egg and fry at medium heat. Flip once, when golden brown. Remove to a plate lined with paper towels to absorb any extra oil, salt to taste and eat hot. In my house, these never make it farther than the paper towels, never mind a serving plate.


Figure 46.v. - Ready to eat, hot out of the pan.
Next week we have a cool dish for a hot night.